Showing posts with label olive oil. Show all posts

Thursday, June 20, 2013

Broccolini with Yogurt-Lemon-Butter Sauce

Broccoli's cute little cousin deserves a special sauce...


Ingredients:

1 bunch broccolini
2 tbs butter (or 1 tbs butter and 1 tbs olive oil)
1-2 cloves minced garlic
1 tsp - 1 tbs freshly squeezed lemon juice (amount depends upon how tart you would like it - I used 1 tbs and it's nicely tart for my taste)
salt and pepper, to taste
2 tbs plain yogurt


Directions:

Begin by steaming the broccolini without chopping it.  While it is steaming, begin melting the butter in a small pan on medium.  Add the olive oil and garlic.  Let cook about 1 minute.


Then, remove from heat and stir-in the lemon juice, salt/pepper and yogurt.

Stick the broccolini with a fork to check for doneness.  When cooked to your satisfaction, use tongs to remove it on a plate(s) and drizzle with the sauce.  Enjoy!


Monday, April 8, 2013

Rosemary-Dill Yogurt Deviled Eggs

I love deviled eggs!  Here's one version of the recipe using fresh herbs and yogurt...


Ingredients:

12 hard boiled eggs
1/3 cup whole milk yogurt
3 tbs. olive oil
2 tbs. apple cider vinegar
1 tsp mustard powder
1/2 tsp cayenne powder
1 tbs each of finely chopped fresh rosemary and dill
Sea salt or Himalayan salt, to taste


Directions:

Hard boil the eggs and allow to chill in the fridge (I prepared my eggs the night before).  Peel the eggs and rinse them, draining off all excess water.  Cut eggs in half and remove the yolk.


Place all yolks I a medium size bowl for mixing the filling.  Mash all the yolks to a smooth consistency using a strong (does not bend easily) fork.  Add the remaining ingredients and continue to mix, combining thoroughly.  I like to taste it to see what else it might need before filling the eggs (i.e., if you want more salt, pepper, etc.).


Once the filling is ready, use a teaspoon to scoop the filling into each one of the eggs.  I don't like to use a lot of plastic containers but this Rubbermaid one (pictured below) is made just for eggs and I love to use it to hold deviled eggs...


Enjoy the eggs alone or on a salad!


Tuesday, January 29, 2013

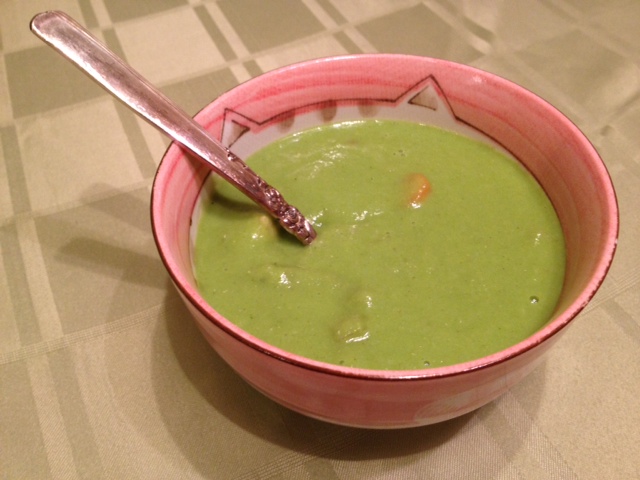
Green Leek Soup


This soup has a variety of textures.  Smooth, pureed base with chicken, carrots and onions.  If you'd like to make a vegetarian soup, simply leave the chicken out.  To make it vegan,  also substitute olive oil for the butter.  Only green items are blended together, creating a nice green color.  The carrots are left unblended to give a sweet bite but not dampen the nice green color.  

Ingredients:

1 lb chicken breasts (optional)
2 medium onions
5 carrots
2 large leeks
4 stalks celery (with leaves, if available)
3 kale leaves
2 medium potatoes, peeled
5 cloves garlic
2 tsp italian seasoning, rosemary, or oregano
salt, to taste
crushed red pepper
2 tbs olive oil
2 tbs butter (or olive oil)
4 cups water (or 2 cups broth and 2 cups water)


Directions:

Cut the chicken up into small bite-sized pieces, peel and chop the carrots and 1 onion.  Stir fry the chicken, carrots, onion and crushed red pepper in olive oil.   If cooking in the same kettle as you will cook the rest, remove and place in large bowl until later.


Separately, chop the potato into little cubes and stir-fry in olive oil (or butter).  As it begins to cook add the leeks, celery, remaining onion, and herbs in olive oil.  Once you can prick the celery with a fork (and before it turns mushy!) chop the kale, mince the garlic and add both.  (In my photo below you do not see potato, as I had it precooked and added it later... But, this is about what the leeks and celery looked like when I added the kale...).


Give it a stir, remove from the heat and add 4 cups water (or water/broth combination).  

Blend the leek mixture in several batches in the blender.  


Place back in a large kettle, add the chicken/carrot mixture to it and slightly reheat together.  Stir completely and serve.  Store in fridge and eat within several days.  Reheat individual portions on stovetop.  

Thursday, January 17, 2013

Cold/Flu Wellness Soup

This soup delivers nature's anti-virals with rosemary, lemongrass, garlic, onions and lemon.  Also, veggies and chicken to give your body strength to recover quicker and healthfully from a cold or flu.  Not to mention the benefits of consuming the warm broth to help with congestion and warm the body.  I've made different variations on this, some of which I added seaweed or celery.  You can always try adding other veggies.  I don't use broth when I make soup because I believe I'm making my own broth with the ingredients I'm using.  So, I find it important to have the herbs, onion and garlic to help flavor it... it just works out so well they are helping you feel better, too!


Ingredients:

2-3 tbs olive oil
2 chicken breasts
3 stalks broccoli
4 carrots
1-2 large onions
5 cloves garlic
rosemary, 5 fresh sprigs
lemongrass, 1 stalk
salt (optional, to taste)
fresh lemon wedges
filtered water (enough to cover)


Directions:

Note about prep:  Have veggies prepared and ready before starting as things cook quickly and if you're not prepared some ingredients can get overcooked.  To  prepare carrots, peel and chop.  For broccoli, cut "woody" parts off stalks (and throw them away) and chop the remainder.  Chop rosemary finely. Peel outer layer off lemongrass and chop into approximately 6" pieces, then cut those down the middle to expose insides.  For garlic, smash cloves with chef's knife to remove skins, then chop finely.  Remove skin from onions and chop.

Note about herbs:  I have the rosemary and lemongrass growing fresh but if you don't you can always use dried herbs or substitute other herbs instead.  

Have your veggies/herbs prepared and ready then heat olive oil in large soup pot on medium-heat.  Using kitchen shears, cut chicken into strips, then cut those strips into small pieces.  Cook the chicken on the heat, stirring for a few minutes until most of the outside looks white.  Now, add the broccoli, carrots, onions, rosemary, and lemongrass.  Stir, then cover and cook for a few minutes.  Add water to cover then bring just to a boil over high-heat.  At once, reduce to a simmer and cook until the veggies are done to your liking.  Take soup off burner, keep cover off (or it will continue cooking) and stir in garlic and salt (if using) .  I add garlic at the end of cooking so as to preserve its beneficial properties.  The lemongrass is not to be eaten, it instead "brews" in the soup like a tea.  Leave the lemongrass stalks in the soup until right before eating as it will continue to steep.  For each bowl of soup squeeze a wedge of fresh lemon into it right before eating.

Cheers to Good Health!

You might also like to try this soup recipe by Feel Divine Food: Bunnicula's Carrot-Top Soup Medley.

Sunday, December 23, 2012

Roasted Red Beet and Garlic Hummus

Several years ago I made a beetroot hummus from a recipe I found in a vegetarian cookbook.  I made it around Christmas time and the color was so beautiful and festive.  This year I finally got to making it again, but this time I made some changes and, oh my, it is yummy!  The roasting of the beet and garlic adds to the flavor, but if you wanted to save some time you could steam the beet and use raw garlic (if using raw garlic, be sure to decrease the amount you use or it will be too strong, garlic-wise).


Ingredients:

1 15 oz. can garbanzo beans (chickpeas)
1 large beetroot (or 1 small)
1/4 cup tahini (sesame seed butter)
1/4 cup olive oil
1 bulb roasted garlic
1 lemon, juiced
1/2 tablespoon ground cumin (or if you used a high speed blender like me you can add the seeds whole before blending)
pinch of salt (I use sea salt or Himalayan)


Directions:

Begin by roasting the beetroot and garlic.  Preheat oven between 350-400 degrees.  Wash the beetroot, do NOT peel, rub with olive oil, then wrap in a piece of tin foil.  Next, take the bulb of garlic and cut the cloves off across the top, just exposing the inside.  Place bulb on a piece of tin foil, then drizzle with olive oil.  Wrap the bulb up in the foil.   Now, place the garlic and beetroot on an oven proof pan and bake until roasted.  You will know the garlic is done when it begins to look caramelized (a bit browned but NOT burned!) and the beet is done when you can stick a fork through to the middle.  I think it took me about 45 minutes to roast the garlic and about 1 hour for the beetroot.  I started the timer at about 30 minutes and kept checking them periodically.

While the beetroot and garlic are roasting begin preparing the other ingredients.  Rinse the garbanzo beans (you can definitely substitute canned beans with freshly soaked and cooked ones!) in a strainer and allow the water to drain off for several minutes.


Combine the garbanzo beans, tahini, olive oil, lemon juice, cumin and salt in a food processor or blender.  Once the garlic has been roasted take it out of the oven, open the tin foil, and allow it to cool enough to handle safely with your hands.  It should look something like this:


Once cooled, squeeze the cloves out of their skins and add to the other ingredients.  Alternatively, if you chose to use raw garlic, just add 2 peeled cloves of raw garlic instead.  Raw garlic is much stronger, that is why I suggest using a much smaller amount.  Once the beet(s) have been roasted, use a fork to "hold" on to the beet(s) and remove the skin by scraping it off with a butter knife.


After the skin has been removed cut the beet into smaller pieces to help it continue to cool.  Allow to cool for a few minutes then add to the other ingredients.


Now, you are ready to blend it up!  Blend up the ingredients until smooth.  Serve immediately or store in the fridge and use within several days.  This hummus is delicious with raw veggies, corn chips, salad or sandwich topper, and the list goes on!  Also, a GREAT addition to the appetizer spread for your holiday potluck or party--- Enjoy!

Check out this link for more feel divine recipes at this week's Wellness Weekend!
Follow Me on Pinterest